
Highlights
- Offline and Private — Runs entirely on your machine with no cloud or API dependencies, ideal for urbanism and architectural workflows.
- Lightweight and Fast — The GGUF format keeps Qwen-Image-Edit efficient, producing realistic edits in under two minutes.
- Full Visual Control — Adjust CFG, denoise, and steps to balance subtle tweaks or bold scene changes.
Generative AI offers new possibilities for urbanism and architectural visualization. However, most workflows depend on cloud models, paid APIs, or GPU-heavy setups. Instead, this guide shows how to build a fully local image-editing pipeline using ComfyUI and Qwen-Image-Edit, a multimodal model that interprets both text and images. Moreover, the quantized GGUF version makes it light enough to run efficiently on GPUs with 8 GB VRAM—or even on CPU-only machines.
With this setup in place, you can make realistic, controllable visual edits to urban scenes directly from text prompts such as:
“Add trees and benches along the sidewalk”
“Change this building to have shops on the ground floor”
“Replace the cars with a pedestrian plaza”
In summary, this guide includes three main parts: first, installing and preparing the models; second, building the ComfyUI workflow; and finally, experimenting with parameters such as CFG, denoise, and steps to refine quality.
Let’s start with the setup.
1. Installing Everything and Preparing the Models (Local Setup)
Before we dive into editing cityscapes and architectural images, let’s prepare a fully local environment. To begin with, this workflow runs entirely offline — no API keys, no cloud GPU, and no data uploads. As a result, you can experiment freely without any external dependencies.
Step 1 — Installing ComfyUI
ComfyUI is a visual AI workflow tool that lets you build image-generation and editing pipelines by connecting nodes instead of writing code. Think of it as a visual editor for generative models — you drag boxes, connect them with lines, and watch your AI process unfold step by step. It’s extremely powerful for image editing, concept design, and urban visualization, because you can control every part of the process: model loading, prompt conditioning, sampling, decoding, and saving. This makes it ideal for architects, urbanists, and researchers seeking privacy and control. On first launch, an empty grid appears as your workspace, ready to be filled with interconnected nodes for models, images, and prompts.
ComfyUI can be installed in two ways:
-
Standalone version: downloaded from the official website and installed like a regular application. This version already includes the Node Manager, so you can install missing custom nodes directly from the interface.
-
Git version: installed by cloning the repository (e.g., for advanced users or custom setups). In this case, you must install the Node Manager manually, because it is not included by default.
Next, open the v1.0 workflow for Qwen Edit for Urbanism. You can find it at the end of the post or in our Git repository. When the workflow loads, the Node Manager will automatically prompt you to install any missing custom nodes. Approve the installations, then close the workflow.
Step 2 — Add GGUF and Qwen Image Edit Support
Qwen-Image-Edit is a multimodal AI model capable of understanding both text and images, allowing image edits through natural language. The GGUF format makes it compact and memory-efficient, enabling faster processing on modest hardware.
Go to the ComfyUI-GGUF & Qwen Edit Utils project pages:
https://github.com/city96/ComfyUI-GGUF
https://github.com/lrzjason/Comfyui-QwenEditUtils
Clone the repositories, or click the green Code button and choose “Download ZIP” for both projects. After downloading, unzip each folder and place it directly into your custom_nodes directory—make sure the unzipped files are not nested inside an extra subfolder.
ComfyUI/custom_nodes/
Step 3 — Download the Required Models
You’ll need three model files, each serving a different purpose in the image-editing process. The first one is the core model that performs the actual visual transformation based on your text prompt.
You can find it here:
👉 https://huggingface.co/QuantStack/Qwen-Image-Edit-2509-GGUF/tree/main
On that page, you’ll see many versions of the same model — Q2, Q3, Q4, Q5, etc. These are quantized variants, meaning they trade a little precision for faster speed and lower VRAM usage. Here’s a quick guide to help you pick the right one:
| Model File | Speed | Image Quality | Recommended For |
|---|---|---|---|
| Qwen-Image-Edit-2509-Q2_K.gguf | Very fast | Low | Very low-end PCs (not recommended) |
| Qwen-Image-Edit-2509-Q3_K_M.gguf | fast | Moderate | CPU-only users needing speed |
| Qwen-Image-Edit-2509-Q4_K_S.gguf | Medium | Good | Mid-range GPUs (6–8 GB VRAM) |
| Qwen-Image-Edit-2509-Q5_K_S.gguf | Medium | Excellent | Recommended for most users |
| Qwen-Image-Edit-2509-Q6_K_S.gguf | Slow | Highest | High-end GPUs with 16+ GB VRAM |
| Qwen-Image-Edit-2509-Q8_0.gguf | Very slow | Best | Only for testing full precision |
The Qwen-Image-Edit model also needs two smaller files to work correctly — one for understanding your text prompts (CLIP) and one for turning the generated data back into a real image (VAE). You can download them from the official Comfy-Org repository on Hugging Face:
-
Text Encoder (CLIP):
https://huggingface.co/Comfy-Org/Qwen-Image_ComfyUI/tree/main/split_files/text_encodersOn that page, pick:
👉qwen_2.5_vl_7b_fp8_scaled.safetensors(about 9 GB — faster and works well locally) -
VAE Decoder:
https://huggingface.co/Comfy-Org/Qwen-Image_ComfyUI/tree/main/split_files/vaeDownload the file:
👉qwen_image_vae.safetensors
Once downloaded, place all three models in:
ComfyUI/
 └── models/
      ├── gguf/
      │    └── Qwen-Image-Edit-2509-Q5_K_S.gguf
      ├── clip/
      │    └── qwen_2.5_vl_7b_fp8_scaled.safetensors
      └── vae/
           └── qwen_image_vae.safetensors
Verifying Your Setup
Open ComfyUI, right-click anywhere in the workspace or search in the node library, and check that you can find these nodes:
-
- GGUF Loader – for loading the main Qwen-Image-Edit model (.gguf file)
- CLIP Loader – for loading the CLIP text encoder
- VAE Loader – for loading the VAE decoder
- TextEncodeQwenImageEditPlus – for connecting text prompts and images
If they appear and can detect your downloaded files, congratulations 🎉 — your local setup is ready!
2. Building the Qwen Image Editing Pipeline in ComfyUI
Now that all the models are downloaded and organized, you can start assembling the full workflow that makes Qwen-Image-Edit operate inside ComfyUI.
At this stage, the goal is to connect every component — the GGUF model, the text encoder (CLIP), the VAE decoder, the input image, and the text prompt — into a single functional chain. Once everything is linked, you’ll be able to type instructions such as “add shops on the ground floor” or “turn this street into a pedestrian zone” and watch ComfyUI generate updated images automatically.
Right-click anywhere in the ComfyUI workspace and search for these three nodes:
- GGUF Loader – loads the main Qwen-Image-Edit model
- Load CLIP – loads the
qwen_2.5_vl_7b_fp8_scaled.safetensorstext encoder - Load VAE – loads the
qwen_image_vae.safetensorsdecoder
Your setup shall look like the figure on the right with the same parameters.

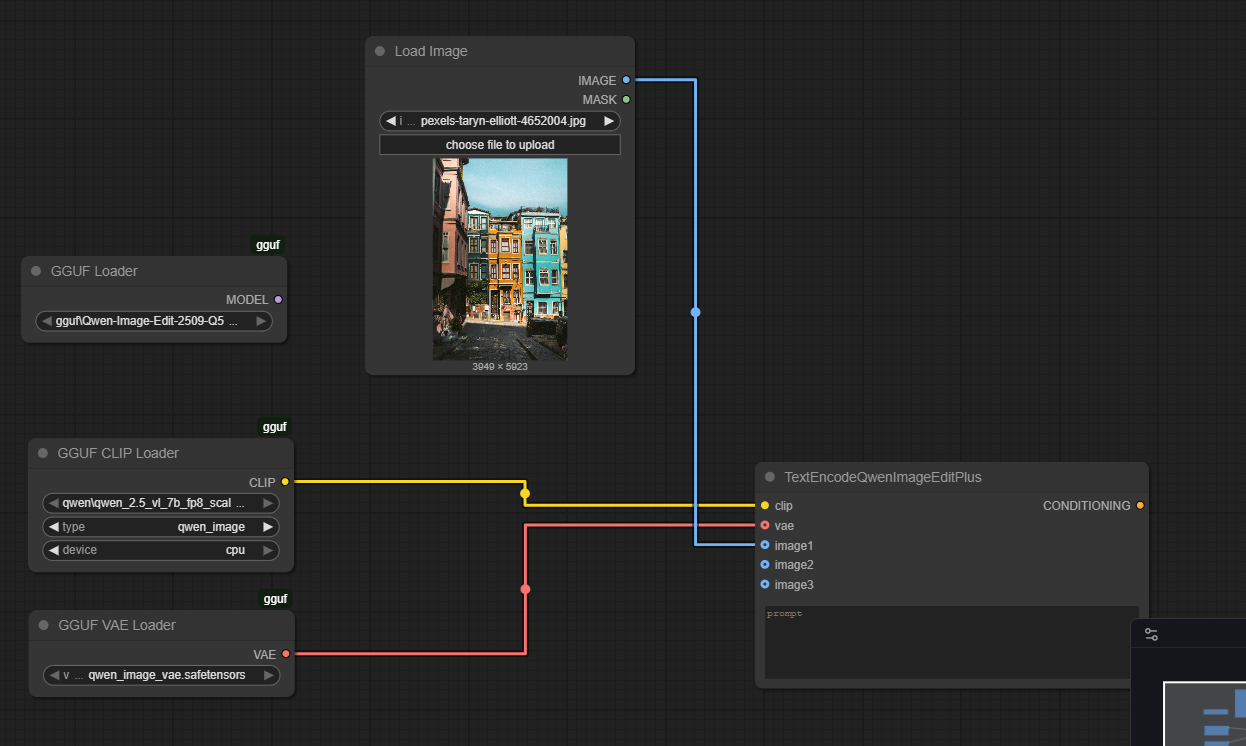
Connecting the Model to Your Images and Prompts
Now that your model nodes are ready, it’s time to make them work together. You’ll connect your input image, prompt, and the Qwen-Image-Edit conditioning node so that ComfyUI can understand your instruction and modify the picture accordingly.
Right-click again and search for:
- Load Image – this node will import your input image (for example, a street or building photo).
- TextEncodeQwenImageEditPlus – this node combines your image with your text prompt
Connect the elements like this:
- The CLIP, and VAE nodes feed into TextEncodeQwenImageEditPlus
- The Load Image node connects its output image into the same TextEncodeQwenImageEditPlus node
Adding the KSampler and the Other Required Elements
At this point, your setup has the model, encoders, and the prompt connection ready.
Now we’ll add the KSampler, which is the part that actually produces your final edited image, and all the other required elements.
Right-click again and search for:
- KSampler – this is ComfyUI’s main diffusion sampler. It takes in a latent (from the VAE) and conditioning (from Qwen) to generate a new image.
- Scale Image to Total Pixels – automatically resizes your image to a manageable resolution (set megapixels to 1.00).
- Get Image Size – extracts width and height from the resized image.
- EmptySD3LatentImage – creates an empty latent space matching the image dimensions, used as the canvas for generation.
- VAE Decode – converts the generated latent output back into a normal image.
- Save Image – saves your result to the ComfyUI output folder.
Your connections should look like this (check the figure for reference). Start by linking the Load Image node to Scale Image to Total Pixels, and then feed its output into Get Image Size. Next, connect the width and height outputs from Get Image Size to EmptySD3LatentImage, creating the correct latent dimensions. From there, route the latent output of EmptySD3LatentImage into the KSampler. In parallel, connect the model input of KSampler to the GGUF Loader, and feed the conditioning from TextEncodeQwenImageEditPlus. Finally, send the KSampler output into VAE Decode, and link that to Save Image to generate and store your final result.
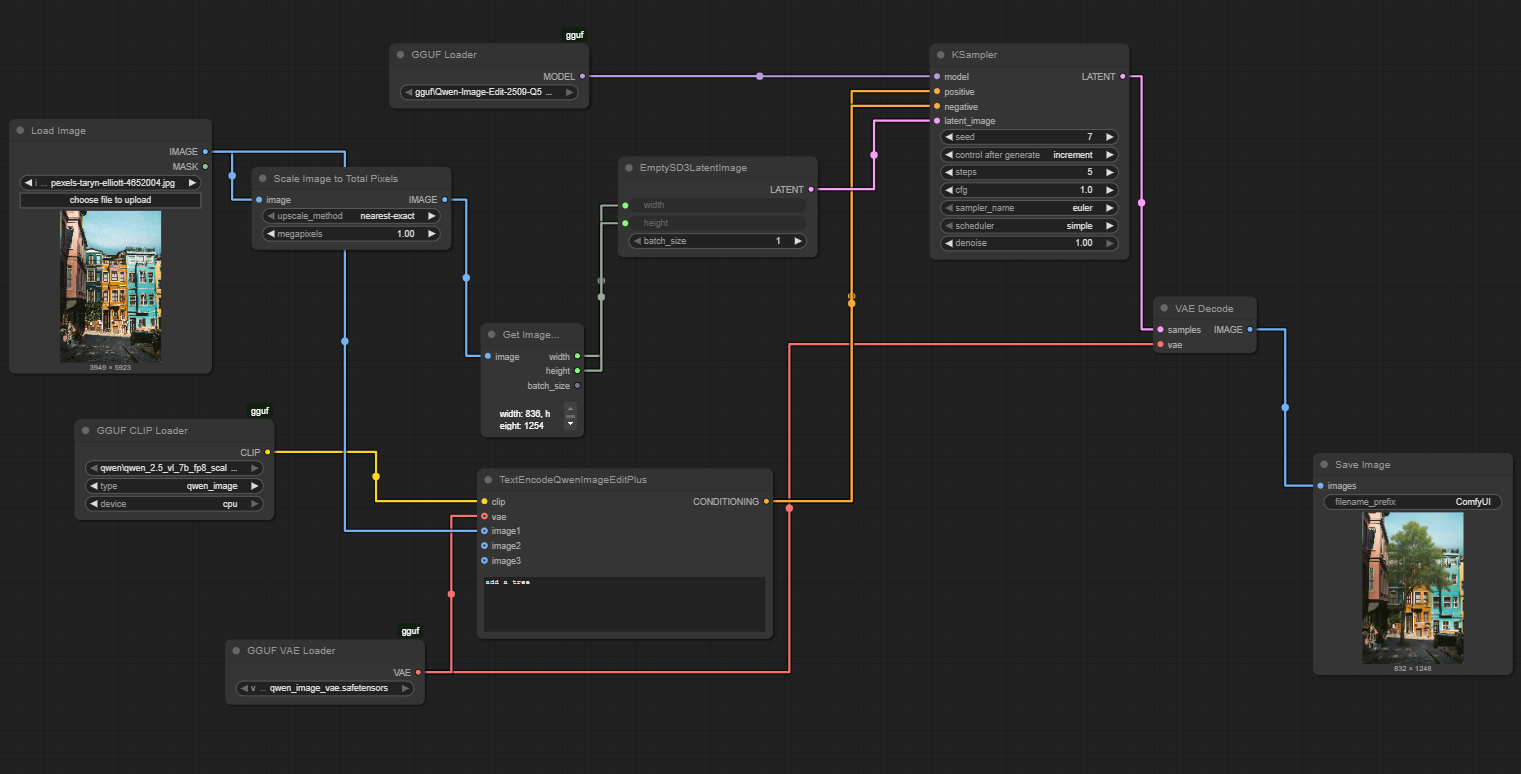
Once these elements are connected, your workflow becomes fully functional. The scaled image is analyzed, encoded, transformed in the latent space according to your text prompt, and then decoded back into a visible edited image — all processed locally by your computer.
3. Experimentation and Parameter Exploration
The core of the image-editing process lies in the KSampler node, where all generative inference occurs. Inside this component, several parameters control the quality, variability, and precision of the output. Understanding their effect is essential for achieving consistent and reproducible results.
To begin with, the seed parameter defines the random starting point of the diffusion process. Using the same seed with identical settings reproduces the same output, which helps when comparing the influence of other parameters. By contrast, changing the seed introduces controlled randomness, often generating new interpretations of the same instruction. Meanwhile, the control after generate option—set to increment—ensures each new image uses a slightly different seed, producing unique but related results.
Next, the steps value determines how many refinement iterations the sampler performs. Lower values such as five create quick previews and coarse adjustments, whereas higher counts (for instance, twenty or thirty) yield smoother and more detailed outcomes at the cost of longer processing time. In practice, Qwen-Image-Edit performs well even with fewer steps, since it relies heavily on prompt and image conditioning.
Similarly, the cfg parameter (classifier-free guidance) controls how closely the output follows the text prompt. A low value around 1.0 keeps changes subtle, while higher values push the model toward stronger, more literal transformations. Balancing this setting helps maintain realism without losing creative control.
As for the sampler_name and scheduler, they define how noise is reduced during diffusion. The Euler sampler offers an efficient trade-off between speed and visual quality, and the simple scheduler keeps results stable across seeds and image sizes.
Finally, the denoise value adjusts how strongly the latent image is modified. A setting of 1.0 applies a full transformation, producing bold edits, whereas smaller values retain more of the original features for subtle modifications. This parameter directly shapes the intensity of your edit—from a light retouch to a complete visual overhaul.

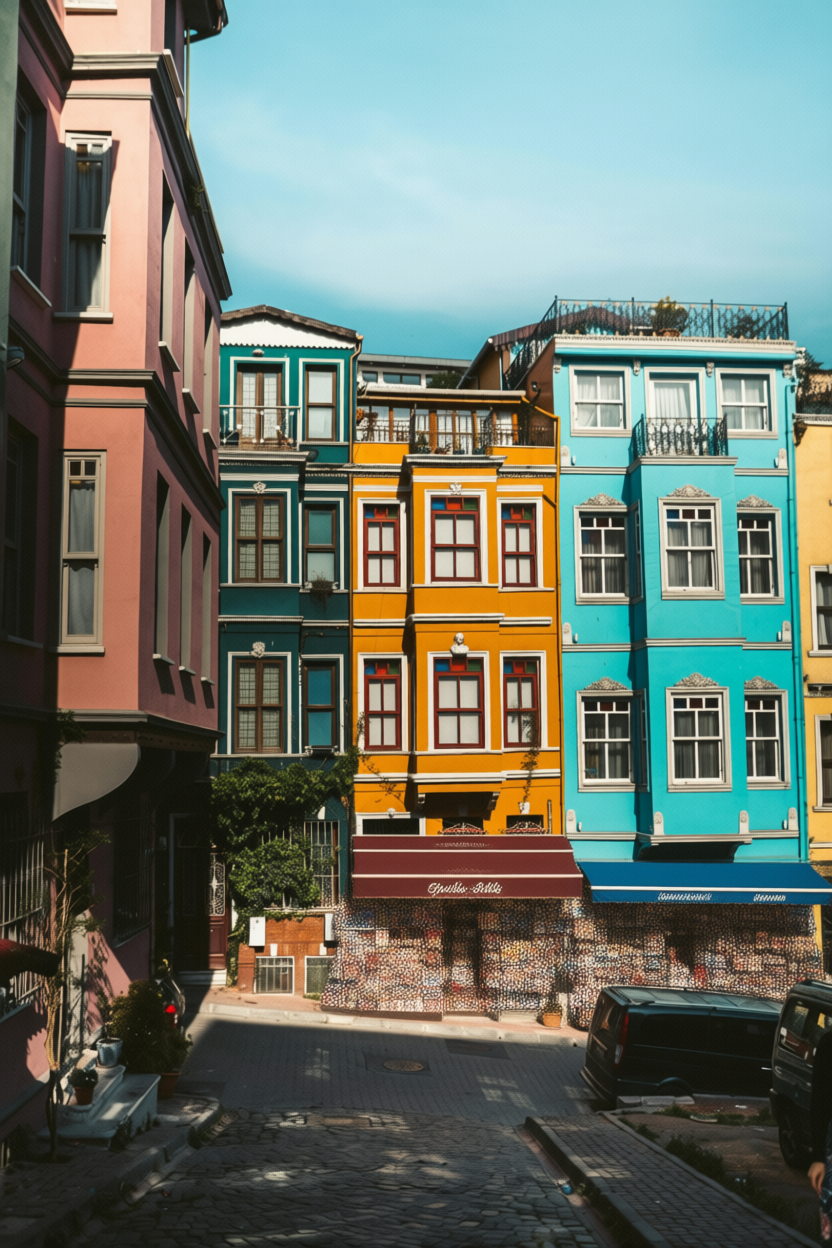
Base image
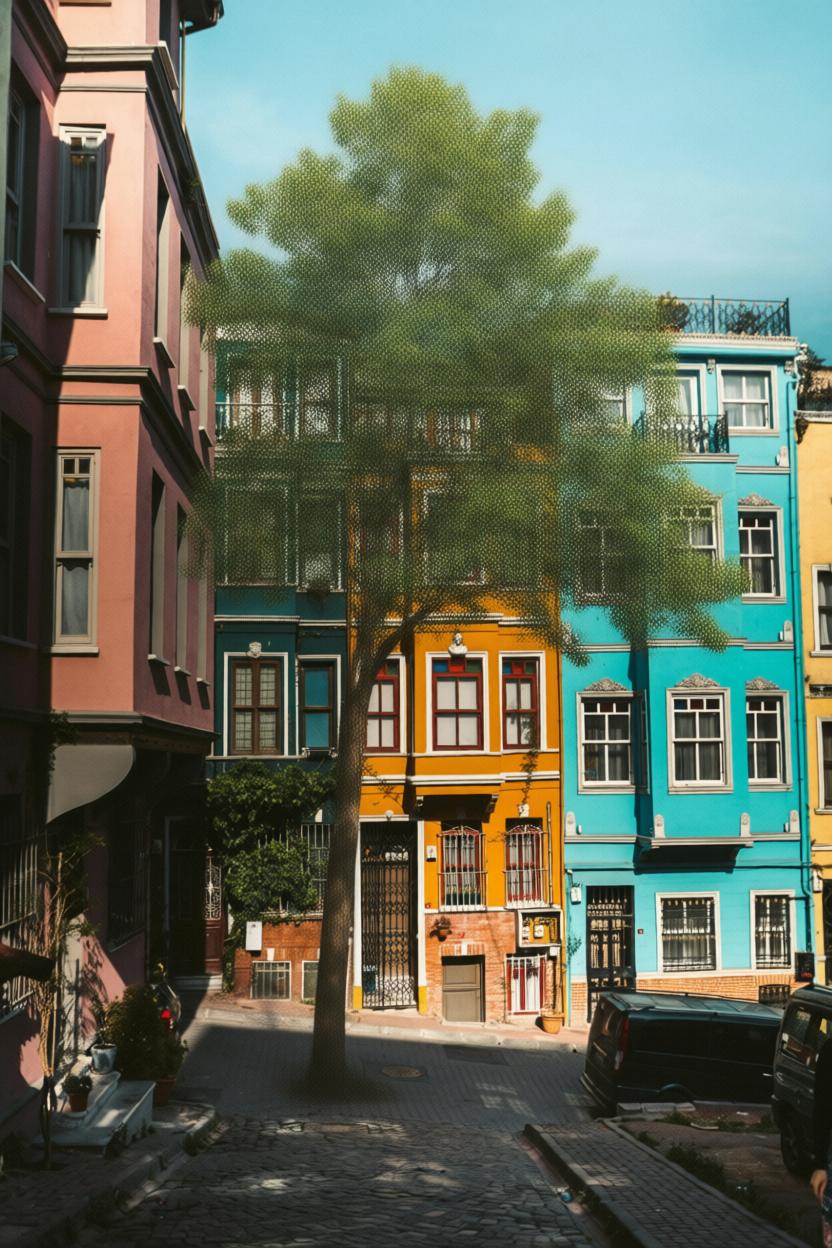
prompt: “add a tree”
prompt: “add shops on the ground floor of the buildings”
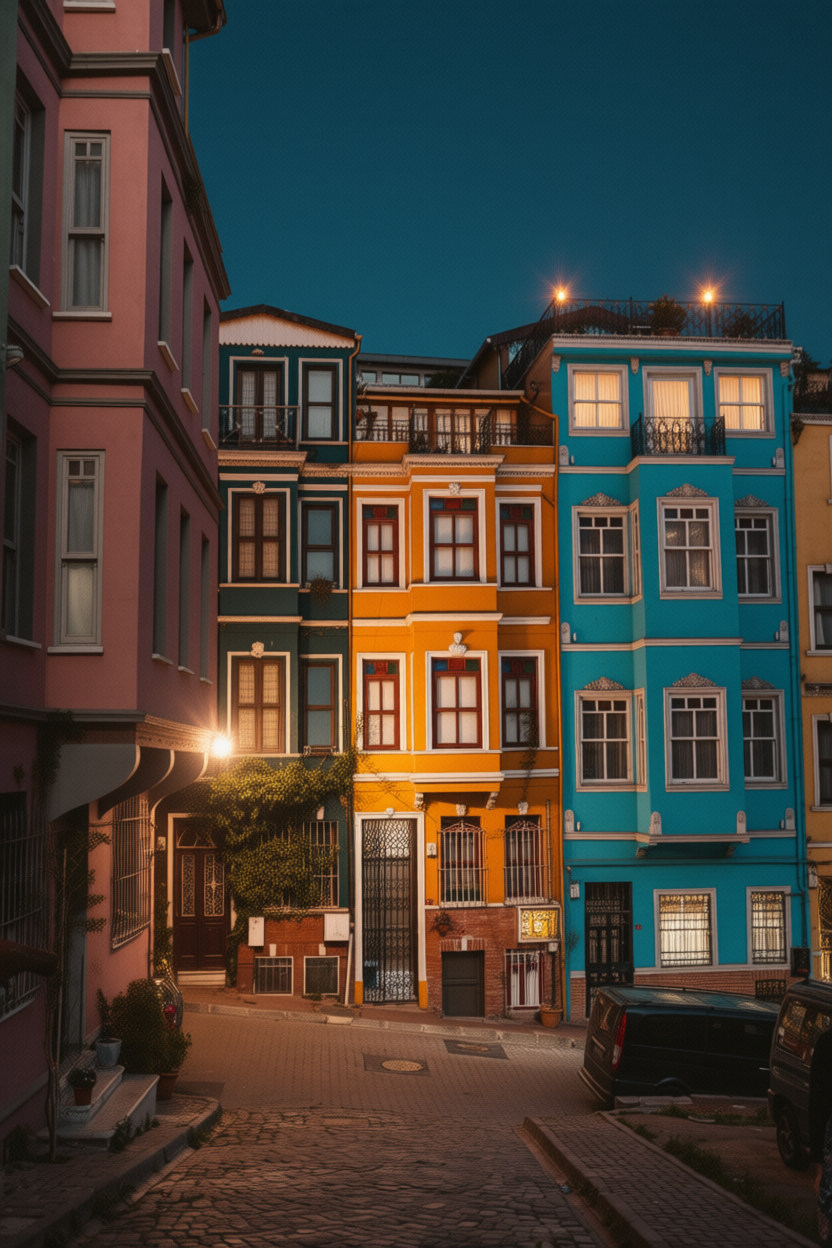
prompt: “night setting with more street lights”
These results show the outcomes obtained with the final Qwen-Edit workflow, each generated from the same base image using a simple text prompt. Depending on the complexity of the requested transformation and the parameters defined in the KSampler—particularly the number of steps and the denoise factor—the processing time varied between 30 seconds and about 2 minutes on an RTX 4060 GPU.
4. To Go Further
-
Qwen-Image-Edit official repository: https://huggingface.co/QuantStack/Qwen-Image-Edit-2509-GGUF
-
ComfyUI documentation and examples: https://github.com/comfyanonymous/ComfyUI
-
Qwen-Image-ComfyUI utilities and text encoders: https://huggingface.co/Comfy-Org/Qwen-Image_ComfyUI
-
Zhang, F., Salazar-Miranda, A., Duarte, F., Vale, L., Hack, G., Chen, M., Liu, Y., Batty, M. & Ratti, C. (2024) ‘Urban Visual Intelligence: Studying Cities with Artificial Intelligence and Street-Level Imagery’, Annals of the American Association of Geographers, 114 (5), pp. 876-897. https://doi.org/10.1080/24694452.2024.2313515
- Perez, J. & Fusco, G. (2025) ‘Streetscape Analysis with Generative AI (SAGAI): Vision-language assessment and mapping of urban scenes’, GeoSpatial Analysis and Modelling, 100063. https://doi.org/10.1016/j.geomat.2025.100063 (ScienceDirect)
5. Download the Workflow
For convenience, you can download the ready-to-use ComfyUI JSON graph that we built in this post from the link below and load it directly into your workspace using File → Load → Workflow.
Table of contents
Leave A Comment