
Highlights
- Core Control Chain — Version 1.1 introduces the ModelSamplingAuraFlow → CFGNorm → LoraLoaderModelOnly sequence, improving stability, texture realism, and prompt accuracy.
- Dual-Image Editing — Combine two or more reference images in a single workflow to add objects, replace materials, or merge visual elements directly inside ComfyUI.
- Faster and More Accurate — The new Lightning LoRA (4-step or 8-step) delivers sharper, cleaner results in under two minutes — with processing as low as 30 seconds on an RTX 4060 GPU.
In the first part of this series, we built a fully local image-editing pipeline for urban and architectural visualization using ComfyUI and Qwen-Image-Edit. That version (v1.0) demonstrated how to run generative image edits entirely offline, combining text and visual prompts to transform cityscapes with instructions like:
“Add trees along the sidewalk” or “Turn this street into a pedestrian plaza.”
We assume that you have followed this tutorial before diving in this new update. Now, with version 1.1, we take that foundation further. This update focuses on advanced sampling control and multi-image editing, allowing you to not only modify a scene, but also merge visual elements across images — for instance, importing a bench from another photo, or changing a building façade to match a different material texture.
1. Advanced Sampling with a Core Control Chain
First, this update focuses on improving both quality and flexibility. The base structure still uses the Qwen-Image-Edit 2509 model in GGUF format, but adds a refined sampling module to stabilize lighting and surface detail.
The key new nodes are:
-
ModelSamplingAuraFlow — smooths the diffusion trajectory for more natural transitions.
-
CFGNorm (BETA) — balances prompt adherence with photorealism, preventing overexposed textures.
-
LoraLoaderModelOnly — injects a Lightning LoRA (4-step or 8-step) for faster inference and higher-quality reconstruction.
These three nodes form the core control chain of version 1.1:
This configuration produces more stable, consistent outputs while preserving prompt flexibility. It also enables fine-tuning of how the model interprets text instructions versus existing image content—ideal for architectural and material edits. Before connecting the new nodes, you’ll first need to download a Lightning LoRA model — an additional lightweight module that enhances reconstruction quality and speeds up inference.
You can find all Lightning variants here:
🔗 https://huggingface.co/lightx2v/Qwen-Image-Lightning/tree/main
Refer to the table below to choose the most appropriate file for your setup:
| Goal | Recommended File | Notes |
|---|---|---|
| Fast prototyping | Qwen-Image-Lightning-4steps-V2.0-bf16.safetensors | Best speed/quality trade-off; ideal for quick previews and design iterations. |
| Detailed scenes / architecture | Qwen-Image-Lightning-8steps-V2.0-bf16.safetensors | Produces sharper edges, richer contrast, and more defined materials. |
| Low VRAM system (≤ 8 GB) | Qwen-Image-fp8-e4m3fn-Lightning-4steps-V1.0-bf16.safetensors | Lightweight version with minimal memory usage and acceptable realism. |
| High-end / CPU use | Qwen-Image-fp8-e4m3fn-Lightning-4steps-V1.0-fp32.safetensors | Maximum numerical precision; slower but most stable for benchmarking. |
Once downloaded, place your chosen .safetensors file in the following directory:
ComfyUI/models/loras/
Then, return to ComfyUI and insert the three nodes shown below

The new sampling nodes add subtle but powerful control options:
| Node | Parameter | Description | Recommended Range |
|---|---|---|---|
| ModelSamplingAuraFlow | shift | Controls how strongly the model moves through latent space during denoising. Higher = stronger edits. | 1.2 – 1.8 |
| CFGNorm | strength | Normalizes prompt adherence to maintain texture balance. Lower = more literal edits, higher = softer realism. | 0.8 – 1.2 |
| LoraLoaderModelOnly | strength_model | Defines how much the LoRA (Lightning) modifies the base model. 1.0 = full effect. | 0.8 – 1.0 |
2. Dual-Image Editing: Adding Objects and Modifying Materials
Version 1.1 introduces a new input configuration that allows two images to be used within the same workflow. This enhancement enables contextual or compositional edits where one image serves as the main canvas, and the other contributes visual information such as an object, texture, or architectural detail.
In this setup, Image 1 remains the base image. Its dimensions define the output size, ensuring consistent framing and spatial coherence. The second image (Image 2), on the other hand, is resized during processing but it is only to prevent memory overload—particularly important for mid-range GPUs.
This example shows how to extend the ComfyUI workflow to include one or more secondary images. In the node TextEncodeQwenImageEditPlus, you can now connect up to three image inputs (image1, image2, image3) in addition to your text prompt.
In this tutorial, we’ll only use one additional image — for example, inserting a red car (image2) into the street scene of image1. However, the same structure allows you to use a third auxiliary image to modify materials, lighting, or other objects.
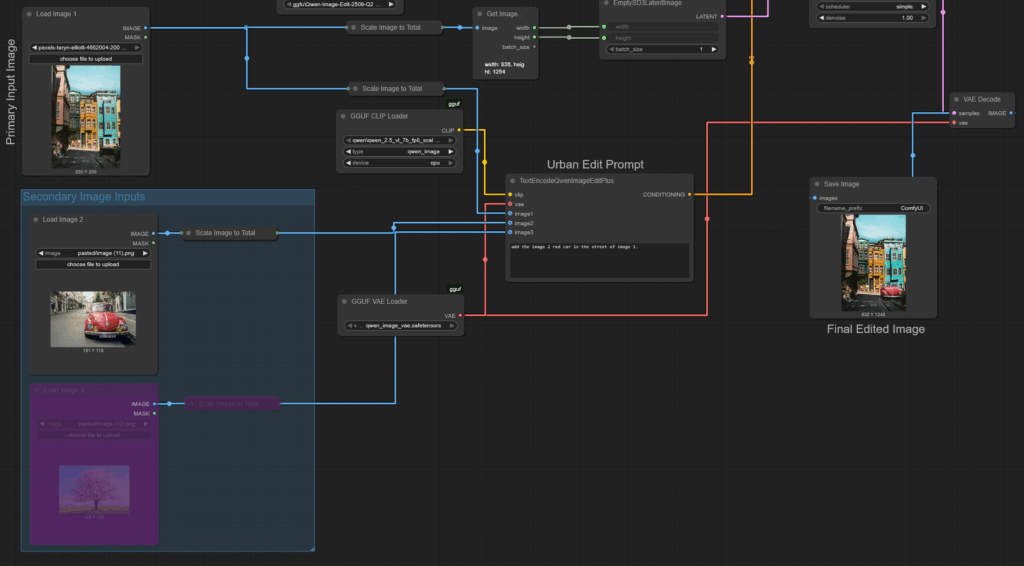
3. Experimentation with Multi-Image Conditioning
As shown in the examples below, you can combine a base image (image 1) with up to two additional inputs (image 2, image 3) to guide the edit more precisely. In this tutorial, we focus on using one additional image — for instance, adding an object or transferring a material. In the first example, image 2 (the red car) is inserted into image 1 using the prompt: “add image 2 red car into the street of image 1.” The second case changes the wall material of image 1 based on the texture of image 2 (a brick wall). Finally, the third example adds a bench into an urban scene using image 2 as the visual model reference.
Base image 1

image 2

Prompt: add image 2 red car into the street of image 1
Result

Base image 1

image 2
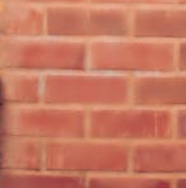
Prompt: changes the walls of the house in image 1 by the brick wall material of image 2
Result

Base image 1
image 2

Prompt: add a bench in image 1 using the bench model of image 2
Result
Each output remains consistent in perspective and lighting, showing that the model now integrates context more effectively. The improved accuracy comes from the two cumulative upgrades introduced in v1.1: the new core control chain and the Dual-Image Editing. Despite the added complexity, the workflow remains extremely fast. Even when using the 8-step Lightning model, processing time never exceeds 130 seconds, while the 4-step variant typically completes in about 30-40 seconds on an RTX 4060 GPU. In the next update, we’ll introduce inpainting with mask support, allowing users to define editable regions directly within the image — ideal for selective urban design modifications.
4. To Go Further
Lightning LoRA models: https://huggingface.co/lightx2v/Qwen-Image-Lightning
5. Download the Workflow
Once again, for convenience, you can download the ready-to-use ComfyUI JSON graph that we built in this post Qwen Image Edit For Urbanism v1.1 from the link below and load it directly into your workspace using File → Load → Workflow.
Table of contents

Leave A Comment