Highlights
• Adds full sequential multi-image editing using custom Python nodes, enabling automated processing with up to six different secondary reference images.
• Introduces the Sequential Loader and Six-Slot Image Buffer, allowing users to run a batch and return to a complete set of edited results.
• Includes an optional Random Image Selector for stochastic experiments and variation testing.
The Qwen Image Edit for Urbanism workflow has progressively evolved from single-image editing (v1.0) to paired image transformations (v1.1). Now, with v1.2, it gains the ability to process multiple images sequentially, fully offline and reproducibly, using custom Python nodes inside ComfyUI. This new release empowers urban researchers, designers, and architects to perform batch edits — such as modifying entire image series of the same street, plaza, or neighborhood — using consistent prompts or iterative refinements.
1. Custom Nodes — Building the Foundation for Sequential Editing
At the heart of this version are three lightweight, open-source Python nodes developed by UGA for ComfyUI. These nodes are available immediately after installing the repository — either by running git clone https://github.com/perezjoan/ComfyUI-QwenEdit-Urbanism-by-UGA or by downloading and unzipping the repository manually into your ComfyUI/custom_nodes directory.
| Node | Category | Function |
|---|---|---|
| Sequential Image Loader | image/sequence | |
| Random Image Selector | image/random | Randomly selects one image among multiple inputs each run, useful for stochastic visualization or model variation testing. |
| Stateful Image Collector | image/sequence | Stores the processed outputs from each run into six persistent slots, allowing users to preview all 6 results at the end of the batch. |
These nodes constitute the backbone of the v1.2 workflow. Together, they enable automation:
[6 Input Images]
      ↓
Sequential or Random Loader (1 image per run)
      ↓
QwenEdit pipeline
      ↓
Stateful Collector (stores run#1..run#6 results)
      ↓
6 preview nodes
You launch the queue once (6 jobs) → Go drink coffee → Return to find all 6 processed urban edits displayed.
2. What a ComfyUI Custom Node Actually Is
A ComfyUI custom node is simply a Python class placed inside the ComfyUI/custom_nodes/ directory. When ComfyUI starts, it scans this directory, imports every .py file, looks for a NODE_CLASS_MAPPINGS dictionary, and registers each class it finds as a new node type. There is no compilation step and no special installation procedure: placing the file in the folder and restarting ComfyUI is sufficient for the node to appear in the interface.
Internally, each node follows the same structure. The INPUT_TYPES classmethod declares the input sockets that will be displayed in the UI. For example:
@classmethod
def INPUT_TYPES(cls):
    return
This tells ComfyUI to generate two inputs—an image tensor and an integer. Similarly, the node declares its outputs through RETURN_TYPES and RETURN_NAMES:
RETURN_TYPES = ("IMAGE", "INT")
RETURN_NAMES = ("selected_image", "index")
Each node also defines a FUNCTION attribute, which names the method ComfyUI should call during execution:
FUNCTION = "select_next"
ComfyUI will therefore execute:
def select_next(...)
whenever the node evaluates. To make the node visible, every Python file ends with a registration block:
NODE_CLASS_MAPPINGS =
NODE_DISPLAY_NAME_MAPPINGS =
When the package contains multiple nodes, the root __init__.py merges all registration dictionaries into a single set that ComfyUI loads on startup. This mechanism allows the repository to expose several custom components while keeping each node defined in its own file.
The repository layout is straightforward and in our case is:
ComfyUI/
  custom_nodes/
    ComfyUI-QwenEdit-Urbanism-by-UGA/
       __init__.py
       sequential_image_selector.py
       random_image_selector.py
       stateful_collector.py
       debug_print.py
3. Integrating the Nodes to your workflow
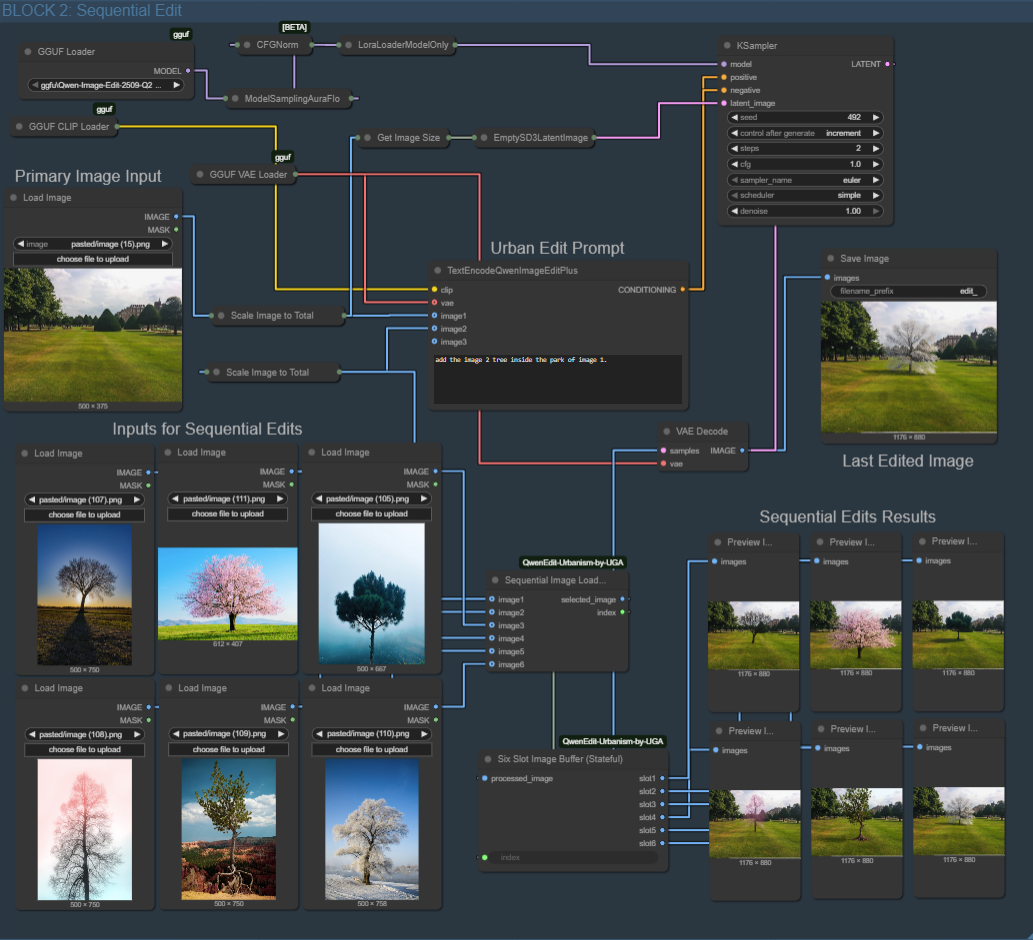
Version 1.2 reorganizes the Qwen Image Edit for Urbanism workflow into two blocks: the original single-image editor, and a new sequential pipeline that can process up to six images across consecutive queue runs. The sequential block relies on two custom nodes. The Sequential Image Loader takes up to six input images and outputs one image per run, advancing automatically each time you press “Queue Prompt.” Its output replaces the single-image input in the Qwen Edit chain. After editing, the processed image and the loader’s index are passed into the Six-Slot Image Buffer, which stores each result in the corresponding output slot while filling unused slots with placeholders to keep previews stable. Connecting each slot to a Preview node lets you watch the six results populate as the workflow iterates. A third node, the Random Image Selector, is included for users who prefer stochastic selection, but it is not wired into the default v1.2 workflow.
Integrating the sequential system introduces the following new connections
-
The output of the six Load Image nodes now feeds into the Sequential Image Loader
-
The
selected_imageoutput of the loader replaces the single-image input -
The processed image, along with the index from the loader, is routed into the Six-Slot Image Buffer. Each slot output is then connected to a dedicated Preview node.
The Random Image Selector follows the same logic as the sequential loader — multiple inputs, a single image output — but selects randomly instead of sequentially. Users who want stochastic variations, probabilistic sampling, or diversity testing may insert this node in place of the sequential loader.
4. Experimentations
To evaluate how well the model can merge ecological elements across scenes, we ran an experiment where vegetation from one photograph is transplanted into another.
Base image
")
Prompt: Take all vegetation visible in image 2 — including trees, shrubs, bushes, ground plants, and any greenery — and incorporate them into the scene of image 1. Preserve the structure, lighting, and perspective of image 1 while integrating the vegetation so that it appears naturally placed and consistent with the environment.
Reference image 1
")
Reference image 2
")
Reference image 3
")
Reference image 4
")
Reference image 5
")
Reference image 6

Result 1

Result 2

Result 3

Result 4

Result 5

Result 6

After letting the workflow run its full sequence while grabbing a coffee, the results appeared consistent and correctly distributed across the six preview slots. As expected with generative editing, however, the prompt is not always obeyed with perfect precision: in some cases, Qwen may copy elements from the second image that are not vegetation — such as pieces of façade, lighting color, or background tones. This happens because the model interprets the entire scene contextually rather than isolating objects.
That’s where the next upgrade (v1.3) comes in: mask-based control. By allowing users to explicitly define which areas of the base image should be modified (and which should remain untouched), masks will significantly reduce unintended transfers and keep the edits focused strictly on the desired objects. Until then, the seed parameter remains the best tool for refinement — simply rerun the workflow with new seeds until you achieve the cleanest integration.
5. Download the Workflow
You can download the ready-to-use ComfyUI JSON graph that we built in this post Qwen Image Edit For Urbanism v1.2 from the link below or from our git repository and load it directly into your workspace using File → Load → Workflow.
Table of contents